03. Linking CSS
Linking CSS Heading
Linking CSS
ND001 C01 L02 03 Linking CSS
Inline
Inline
Although CSS is a different language than HTML, it’s possible to write CSS code directly within HTML code using inline styles.
To style an HTML element, you can add the style attribute directly to the opening tag. After you add the attribute, you can set it equal to the CSS style(s) you’d like applied to that element.
<p style="color: red;">I'm learning to code!</p>The code in the example above demonstrates how to use inline styling. The paragraph element has a style attribute within its opening tag. Next, the style attribute is set equal to color: red;, which will set the color of the paragraph text to red within the browser.
You might be wondering about the syntax of the following snippet of code: color: red;. At the moment, the details of the syntax are not important; you’ll learn more about CSS syntax in other exercises. For now, it’s important to know that inline styles are a quick way of directly styling an HTML element.
If you’d like to add more than one style with inline styles, simply keep adding to the style attribute. Make sure to end the styles with a semicolon (;).
<p style="color: red; font-size: 20px;">I'm learning to code!</p>You can also stick CSS rules in the style attribute of an HTML element. In dummy.html, we have a link that doesn’t actually go anywhere. Let’s make it red via an inline style so we remember it’s a dead link:
<p>
  Want to try crossing out an
  <a href="nowhere.html" style="color: #990000; text-decoration: line-through;">obsolete link</a>
  ? This is your chance!
</p>
Like page-specific styles, this is the same CSS syntax we’ve been working with. However, since it’s in an attribute, it needs to be condensed to a single line. Inline styles are the most specific way to define CSS. The color and text-decoration properties we defined here trump everything. Even if we went back and added a text-decoration: none to our <style> element, it wouldn’t have any effect.
Inline styles should be avoided at all costs because they make it impossible to alter styles from an external stylesheet. If you ever wanted to re-style your website down the road, you can’t just change a few rules in your global styles.css file—you’d have to go through every single page and update every single HTML element that has a style attribute. It’s horrifying.
That said, there will be many times when you need to apply styles to only a specific HTML element. For this, you should always use CSS classes instead of inline styles.
Style Tag
Style Tag
Inline styles are a fast way of styling HTML, but they also have limitations. If you wanted to style, for example, multiple <h1> elements, you would have to add inline styling to each element manually. In addition, you would also have to maintain the HTML code when additional <h1> elements are added.
Fortunately, HTML allows you to write CSS code in its own dedicated section with the <style> element. CSS can be written between opening and closing <style> tags. To use the <style> element, it must be placed inside of the <head> element.
<head>
  <style></style>
</head>
After adding a <style> tag in the head section, you can begin writing CSS code.
<head>
  <style>
    p {
      color: red;
      font-size: 20px;
    }
  </style>
</head>
The CSS code in the example above changes the color of all paragraph text to red and also changes the size of the text to 20 pixels. Note how the syntax of the CSS code matches (for the most part) the syntax you used for inline styling. The main difference is that you can specify which elements to apply the styling to.
External Stylesheets
External Stylesheets
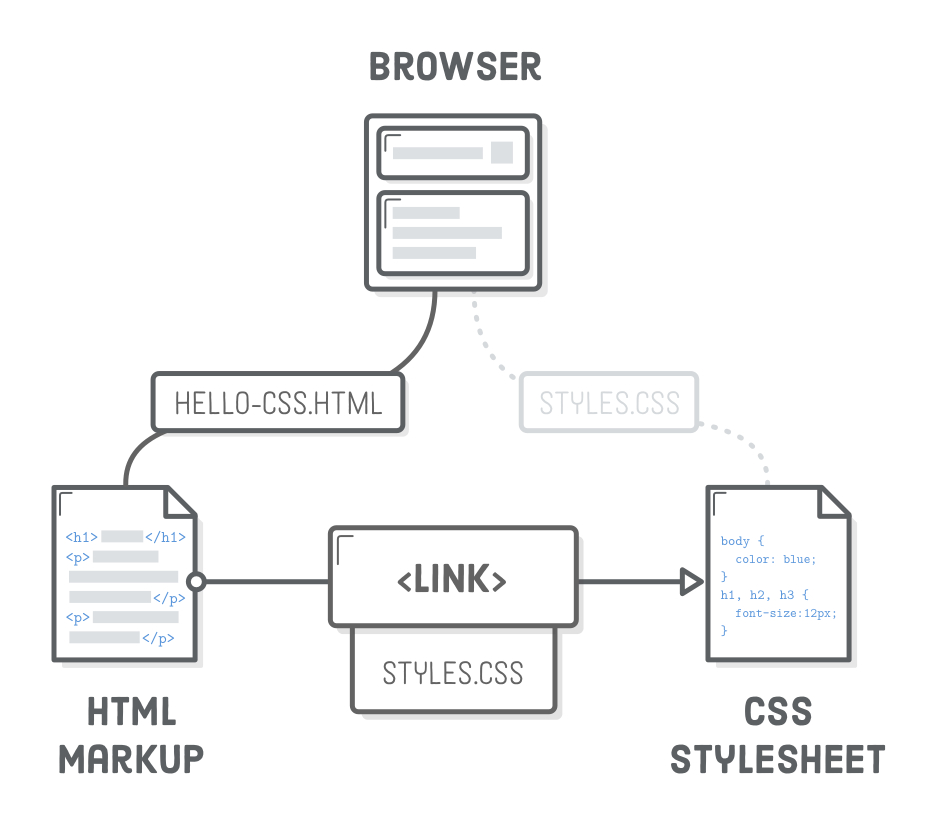
When HTML and CSS code are in separate files, the files must be linked. Otherwise, the HTML file won’t be able to locate the CSS code, and the styling will not be applied.
You can use the <link> element to link HTML and CSS files together. The <link> element must be placed within the head of the HTML file. It is a self-closing tag and requires the following three attributes:
href— like the anchor element, the value of this attribute must be the address, or path, to the CSS file.type— this attribute describes the type of document that you are linking to (in this case, a CSS file). The value of this attribute should be set to text/css.rel— this attribute describes the relationship between the HTML file and the CSS file.
Because you are linking to a stylesheet, the value of rel should be set to stylesheet.
When linking an HTML file and a CSS file together, the <link> element will look like the following:
<link href="https://udacity.com/style.css" type="text/css" rel="stylesheet" />Specifying the path to the stylesheet using a URL is one way of linking a stylesheet.
If the CSS file is stored in the same directory as your HTML file, then you can specify a relative path instead of a URL, like so:
<link href="./style.css" type="text/css" rel="stylesheet" />Using a relative path is very common way of linking a stylesheet.
<link rel="stylesheet" href="styles.css" />Note that in HTML5, you actually don’t have to specify type="text/css" here.
So you’ve just learned that using the <link> element allows you to link HTML and CSS files together. What about linking a CSS file to another CSS file? You can have all your styles living inside one main CSS file, or you can use @import to break your styles (one for layout, one for images, one for blog cards, etc.) into a number of smaller, focused files. This makes it a lot easier to manage the styles they contain and your code is more scalable and modular!
// at the top of your main CSS file

@import “./layout”;
@import “./images”;
@import “./blog-cards”;
External Stylesheets

Relationship between HTML and CSS files